Upload Your Game to the Oppai Launcher
Upload your game build folder to Oppai using the sync command from Oppai CLI.
The sync command uploads a folder, not a .zip file.
For this tutorial, you must select the folder containing your finished game build, including the game's executable files and all required game files.
If you want to upload a .zip file instead, use the appropriate Oppai CLI command for ZIP uploads.
The first upload requires some configuration steps. During this process, Oppai CLI automatically creates a mapping file.
The mapping file stores the relationship between your local build folder and the build stored on Oppai. It can be reused later when updating your game, allowing only changed files to be uploaded.
Future updates are faster because Oppai CLI can reuse your previous mapping file.
Prerequisites
Before you start, make sure you have:
- A game page already created in Oppai
- A finished game build folder ready to upload. If you are using Ren'Py, use the Market build.
- Oppai CLI downloaded and available on your computer
If you haven't created a game page yet, access Oppai Dashboard and create your game first.
Your game must be built before uploading
Oppai Launcher distributes the finished build of your game.
The folder you upload must contain the actual game files that players need to download and run.
For example, a market build for Windows, Mac and Linux might look like this:
MyGame/
├── MyGame.exe
├── MyGame.sh
├── MyGame.app
├── game/
├── lib/
└── ...
Important: The selected folder should contain the game's executable and all other files required to run the game.
Using Ren'Py?
If your game is made with Ren'Py, we strongly recommend creating a Market build before uploading it to Oppai Launcher.
A Market build creates distributable versions of your game for the supported operating systems, making it more suitable for distribution through Oppai Launcher.
See:
How to Build a Market Distribution in Ren'Py
Note: If you are using another game engine, create a proper release/distribution build according to that engine's documentation before uploading it.
Upload process
Follow these steps to upload your game build:
- Select a mapping file
- Select your game
- Select a depot
- Select your build folder
- Select supported platforms
- Select the launch file
- Choose the main build
- Ignore files or folders
- Save your mapping file
- Upload your build
Starting the upload process
To start the upload process, open a terminal in the folder where you have the Oppai CLI executable.
If you need help opening a terminal in the correct folder, follow this guide:
How to open a terminal in the Oppai CLI folder
Then run the sync command using the executable for your operating system.
Windows
On Windows, run:
.\oppaicli.exe sync
macOS or Linux
On macOS or Linux, run:
./oppaicli sync
Note: The executable name may be different depending on the version you downloaded. Use the actual executable filename included with your Oppai CLI download.
During the first upload, Oppai CLI will create a mapping file automatically.
1. Selecting a mapping file
If you already have mapping files from previous uploads, Oppai CLI will display them.
You can select an existing mapping file to reuse your previous configuration.
For a new upload, select:
Create new mapping
In the example below, type 11.
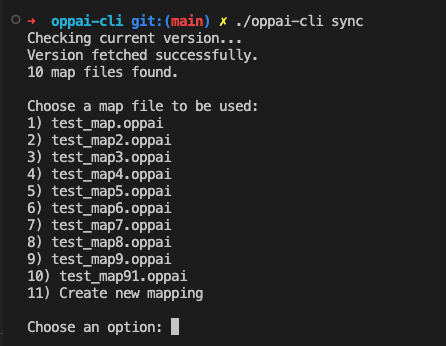
Note: If this is your first upload, this step will be skipped because no previous mapping files exist.
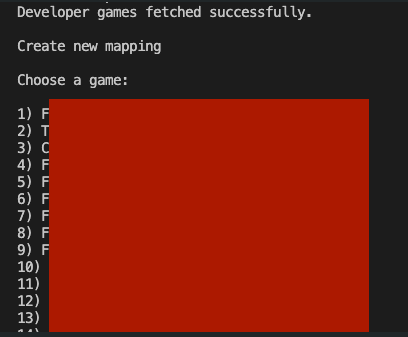
2. Selecting your game
Next, select the game that you want to upload.
Oppai CLI will display all games available for your developer account.
Choose the game that this build belongs to.
3. Selecting a depot
After selecting your game, you need to select where this build will be stored.
A depot is a storage location for your game builds.
You can:
- Create a new depot
- Select an existing depot
If you select an existing depot, the new upload will replace the files currently stored in that depot.
Note: The same depot can be used for multiple operating systems if needed.

4. Selecting your game build folder
This is one of the most important steps.
For example, your build may look like this:
MyGame/
├── MyGame.exe
├── game/
├── lib/
└── ...
The correct path is:
C:\Projects\MyGame
Do not provide:
C:\Projects\MyGame.zip
You should upload the folder containing the individual game files. Do not compress the build into a ZIP file before using the sync command.
The selected folder should contain the game executable
For example:
MyGame/
├── MyGame.exe
├── game/
├── lib/
└── ...
The executable does not need to be in a specific location inside the build, but it must be available so you can select it as the game's entry point in the next step.
Important: Think of the selected folder as the finished game that you would distribute to a player. It should contain the executable and all files required to run the game.
You can enter either an absolute or relative path.
Absolute path:
C:\Projects\MyGame
Relative path:
..\MyGame

Note: The application checks if the folder exists. If the path is incorrect, you will be asked to enter it again.
5. Selecting supported platforms
A build can support one or multiple operating systems.
Select which platforms are supported by this build.
Use:
Spacebarto select or unselect an optionEnterto confirm your selection

Important: Only select platforms for which the uploaded build contains a working game executable.
For example, if the build only contains a Windows executable, select Windows.
If the build contains the required files for Windows, macOS, and Linux, you can select all three.
6. Selecting the launch file
After selecting the platforms, you need to define which file starts the game.
This file is called the entry point.
The Oppai Launcher will open this file when the player starts the game.
Oppai CLI will automatically search for possible executable files and show suggestions.
If your executable is not listed, select the Other option and enter the path manually.
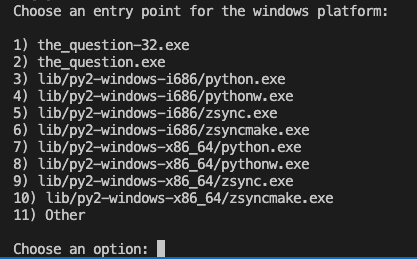
You need to select a launch file for each supported platform.
For example:
Windows → MyGame.exe
Linux   → MyGame.sh
macOS   → MyGame.app
The exact files depend on how your game was built.
Important: The entry point must point to a file inside the game build folder you uploaded.
7. Choosing the main build
After configuring the launch files, you need to choose if this build should be the main build.
The Oppai Launcher uses the main build as the default version available for players to download.
There can only be one main build for each operating system.
Choose the option that matches your needs.

Note: If you select
y(yes), this build will become the main build for all selected platforms.You can also change the main build settings later from the game dashboard:
8. Ignoring files or folders
You can choose files or folders that should not be uploaded.
This is useful for files that are only needed during development, such as:
- Temporary files
- Logs
- Development tools
- Cache folders
Enter the path of each file or folder you want to ignore.
For folders, add / at the end of the path.
Example:
cache/
logs/
debug.log
When you finish adding ignored files, type:
stop
to continue.

Tip: Do not ignore files that are required for the game to run.
9. Saving your mapping file
After finishing the setup, Oppai CLI will ask if you want to save the mapping file.
We strongly recommend saving it.
The mapping file allows future updates to reuse your previous upload settings and compare your local files with the files already stored on Oppai.
This means future updates only need to upload changed files instead of uploading the entire build again.
If you choose to save it, enter a name for your mapping file.

Important: Keep your build folder in the same location after saving the mapping file. Moving or renaming the folder may prevent future updates from working correctly.
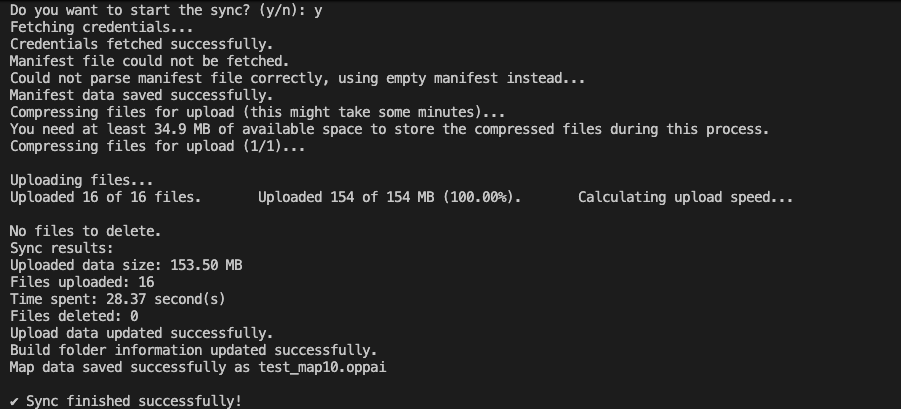
10. Uploading your build
Before starting the upload, Oppai CLI will show a summary of your settings.
If everything is correct, confirm the upload.
Your build upload will now begin.
First, Oppai CLI prepares the required files. Depending on the size of your game, this may take some time.
After preparation is complete, the upload starts automatically.
During the upload, you will see:
- Upload progress
- Upload speed
- Current status
When the upload finishes, Oppai CLI will confirm if the process was successful.
Next steps
Your build is now uploaded to Oppai.
For future updates, you can reuse your saved mapping file and upload only the changed files.
To learn how to update an existing build, continue with: